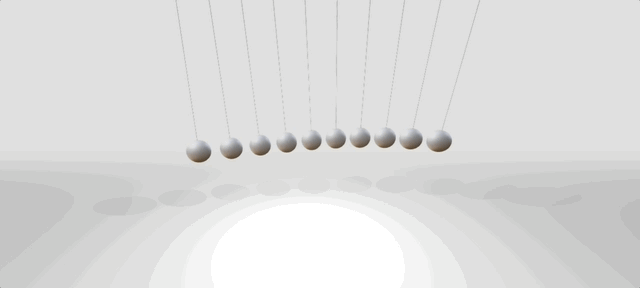
今天来看一个球体摆锤的动画效果
1. 初始化 Three.js 渲染器
首先,我们需要创建 WebGL 渲染器,它将负责在 canvas 元素上绘制 3D 场景。
const renderer = new THREE.WebGLRenderer({
  canvas: document.getElementById("canvas"),
  antialias: true, // 抗锯齿,使渲染效果更平滑
});
renderer.setSize(window.innerWidth, window.innerHeight);
2. 创建摄像机和场景
const camera = new THREE.PerspectiveCamera(
  75,
  window.innerWidth / window.innerHeight,
  0.1,
  1000
);
camera.position.z = 5; // 让摄像机向后移动以观察整个场景

const scene = new THREE.Scene();
scene.background = new THREE.Color(0xe0e0e0); // 设置背景颜色
scene.fog = new THREE.Fog(0xe0e0e0, 1, 15); // 添加雾化效果
PerspectiveCamera(fov, aspect, near, far):创建透视相机。fov:视角(75 度)。aspect:宽高比(基于窗口大小)。near, far:可视范围(0.1 到 1000)。
camera.position.z = 5:将摄像机向后移动 5 个单位。scene.background:设置场景背景颜色。scene.fog:添加雾化效果,使远处物体逐渐消失。
3. 添加轨道控制器
const controls = new THREE.OrbitControls(camera, renderer.domElement);
controls.enableDamping = true;
controls.dampingFactor = 0.1;OrbitControls:允许鼠标拖动旋转相机。enableDamping:启用阻尼效果,增加惯性。dampingFactor:设置阻尼系数,使旋转更平滑。
4. 添加光照
const ambientLight = new THREE.AmbientLight(0xffffff, 0.5);
scene.add(ambientLight);

const light2 = new THREE.PointLight(0xffffff, 0.5);
light2.position.set(0, 1, 0);
scene.add(light2);

const light = new THREE.PointLight(0xffffff, 0.1);
light.position.set(0, 2, 0);
scene.add(light);
light.castShadow = true;
light.shadow.mapSize.width = 4096;
light.shadow.mapSize.height = 4096;
light.shadow.camera.near = 0.1;
light.shadow.camera.far = 30;
renderer.shadowMap.enabled = true;
renderer.shadowMap.type = THREE.PCFSoftShadowMap;AmbientLight:环境光,使整个场景都有基础亮度。PointLight:点光源,为特定位置添加光照效果。castShadow:开启阴影。shadowMap:启用阴影贴图,使物体能投射阴影。
5. 创建 3D 物体
载入 Matcap 纹理
const matcap = new THREE.TextureLoader().load(
  "https://raw.githubusercontent.com/nidorx/matcaps/master/1024/5C4E41_CCCDD6_9B979B_B1AFB0.png"
);
Matcap 纹理用于 MeshMatcapMaterial,可以模拟材质的光照效果。
初始化 3D 物体
首先,我们定义了几个用于创建 3D 物体的几何体和材质:
const ballGeo = new THREE.SphereBufferGeometry(0.3, 32, 32)
const ballMat = new THREE.MeshMatcapMaterial({ matcap: matcap })

const hairGeo = new THREE.CylinderBufferGeometry(0.006, 0.006, 8, 32)
const hairMat = new THREE.MeshPhongMaterial({ color: 0xcccccc })ballGeo:使用SphereBufferGeometry创建一个半径为0.3,分段数为32的球体,模拟球体。ballMat:使用MeshMatcapMaterial让球体具有类似雕塑的光照效果。hairGeo:创建一个非常细长的CylinderBufferGeometry作为“头发”。hairMat:使用MeshPhongMaterial,颜色设为0xcccccc(灰色)。
接下来,我们使用循环创建 10 组物体,每个组都包含一个“头部”(球体)和“头发”(圆柱体)。
for (let i = 0; i < 10; i++) {
  const group = new THREE.Group();
  scene.add(group);

  const ball = new THREE.Mesh(ballGeo, ballMat);
  ball.position.y = -6;
  ball.castShadow = true;
  ball.receiveShadow = true;
  group.add(ball);

  const hair = new THREE.Mesh(hairGeo, hairMat);
  hair.position.y = -2;
  group.add(hair);

  group.position.x = -3 + i * 0.7;
  group.position.y = 6;

  meshes.push(group);
}- 使用
THREE.Group()创建一个组合对象group,并将其添加到场景。 ball作为“头部”,位于y = -6位置,启用了阴影投射。hair作为“头发”,放置在y = -2位置,并添加到group。group的x位置随着i变化,使得 10 个对象沿x轴排列,间距为0.7。- 最后,把
group存入meshes数组,以便后续管理。
然后,我们使用 GSAP 动画库让这些组对象进行左右摇摆。
gsap.fromTo(
  group.rotation,
  { x: -0.3 },
  {
    duration: 1.5,
    x: 0.3,
    repeat: -1,
    ease: "power1.inOut",
    yoyo: true,
    delay: i * 0.1,
  }
);group.rotation.x在-0.3和0.3之间来回摆动。- 动画持续
1.5秒,并无限重复 (repeat: -1)。 yoyo: true让动画反向播放,实现左右摇摆的效果。delay: i * 0.1让每个group的动画有一个时间间隔,形成错落的动画效果。
最后,我们在场景中添加一个地面,以提供视觉上的参考。
const geoPlane = new THREE.PlaneBufferGeometry(100, 100);
const mat3 = new THREE.MeshPhongMaterial({
  color: 0xffffff,
  shininess: 0.4,
  metalness: 0.2,
});
const plane = new THREE.Mesh(geoPlane, mat3);
plane.rotation.x = -Math.PI / 2;
plane.position.y = -2;
plane.receiveShadow = true;
scene.add(plane);
6. 渲染循环
const render = () => {
  requestAnimationFrame(render);
  renderer.render(scene, camera);
  controls.update();
  scene.rotation.y += 0.005;
};
render();requestAnimationFrame(render):持续调用render以保持动画流畅。controls.update():更新OrbitControls的状态。scene.rotation.y += 0.005:使整个场景缓慢旋转。
7. 监听窗口大小变化
const resize = () => {
  camera.aspect = window.innerWidth / window.innerHeight;
  camera.updateProjectionMatrix();
  renderer.setSize(window.innerWidth, window.innerHeight);
};
window.addEventListener("resize", resize);updateProjectionMatrix():更新摄像机投影矩阵,使其适应新窗口大小。setSize():调整渲染器尺寸。