在 Three.js 中,BufferAttribute 是存储和管理顶点数据的核心类。它决定了顶点位置、法线、颜色、UV 等信息如何传递到 GPU,是 性能优化 和 自定义几何体 的基础。
我们先来看一个例子,使用Boxgeometry创建一个立方体
// 创建一个立方体
const geometry = new THREE.BoxGeometry(1, 1, 1);
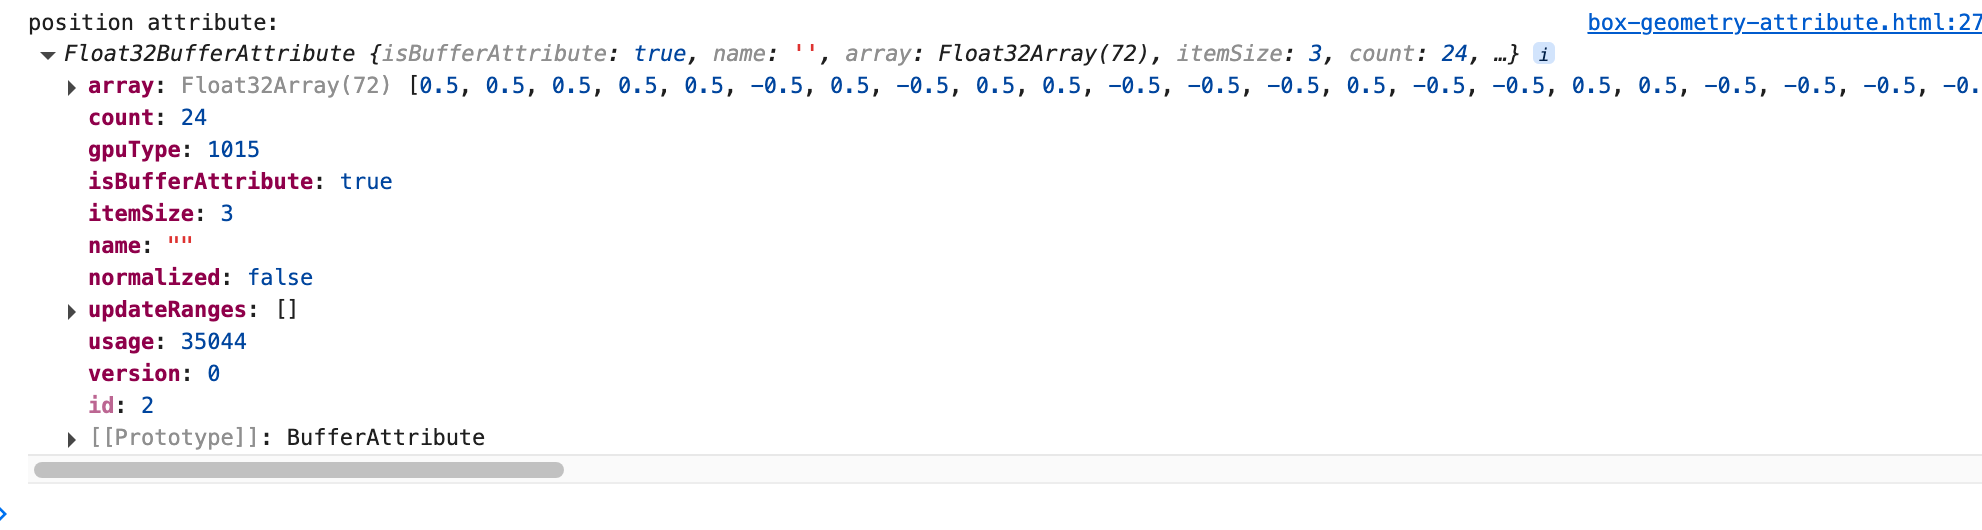
console.log('position attribute:', geometry.getAttribute('position'));在控制台里,你会看到:
虽然 BoxGeometry 使用很方便,但它的局限性很明显。比如:
- 你只能用现成的几何体(立方体、球体、圆柱体),无法随意增加或减少顶点。
- 如果我想在立方体的正中心额外加一个点(用来做动态效果,或者作为新面的基准),
BoxGeometry并没有提供 API 来做到这一点。 - 想修改某个顶点的位置?也没有现成的方法,只能绕到内部数据结构里去硬改。
- 如果要让立方体表面产生“波动”效果,只能重新生成整个几何体,效率很低。
换句话说,BoxGeometry 像是一块“固定模具”,你能直接拿来用,但不能随心所欲地调整模具本身。
而 BufferAttribute 则完全不同:它让你直接管理底层的顶点数组。
你想在立方体中间加一个点,就直接往数组里插入一组三维坐标;你想实时拉动某个顶点,就直接改数组里的值,再 needsUpdate = true。所有修改都会立刻反映到 GPU 上。
什么是BufferAttribute
在 WebGL 渲染中,所有顶点数据最终都会被上传到 GPU。Three.js 中的 BufferAttribute 就是这一环节的“桥梁”。它的作用是:
- 存储顶点数据:使用
TypedArray(如Float32Array、Uint16Array)管理大规模数据。 - 高效传输:数据会直接对应到 GPU 缓冲区,避免额外开销。
- 统一管理:支持位置、颜色、法线、UV 等多种顶点属性。
怎么创建
构造函数:
BufferAttribute(array, itemSize, normalized)array:TypedArray,存储数据itemSize:每个顶点的分量数量(1–4)normalized:是否归一化(常用于整数类型)
示例:
// 顶点位置(每个顶点 3 个坐标:x, y, z)
const positions = new Float32Array([
    0, 0, 0,   // 顶点1
    1, 0, 0,   // 顶点2
    0, 1, 0    // 顶点3
]);

// 创建 BufferAttribute,每个顶点有 3 个分量
const positionAttribute = new THREE.BufferAttribute(positions, 3);
这段代码创建了一个 Float32Array,里面依次存放了三个顶点的坐标 (x, y, z):
- 顶点1:
(0, 0, 0) - 顶点2:
(1, 0, 0) - 顶点3:
(0, 1, 0)然后用BufferAttribute封装,告诉 Three.js 每个顶点包含 3 个分量(itemSize=3)。
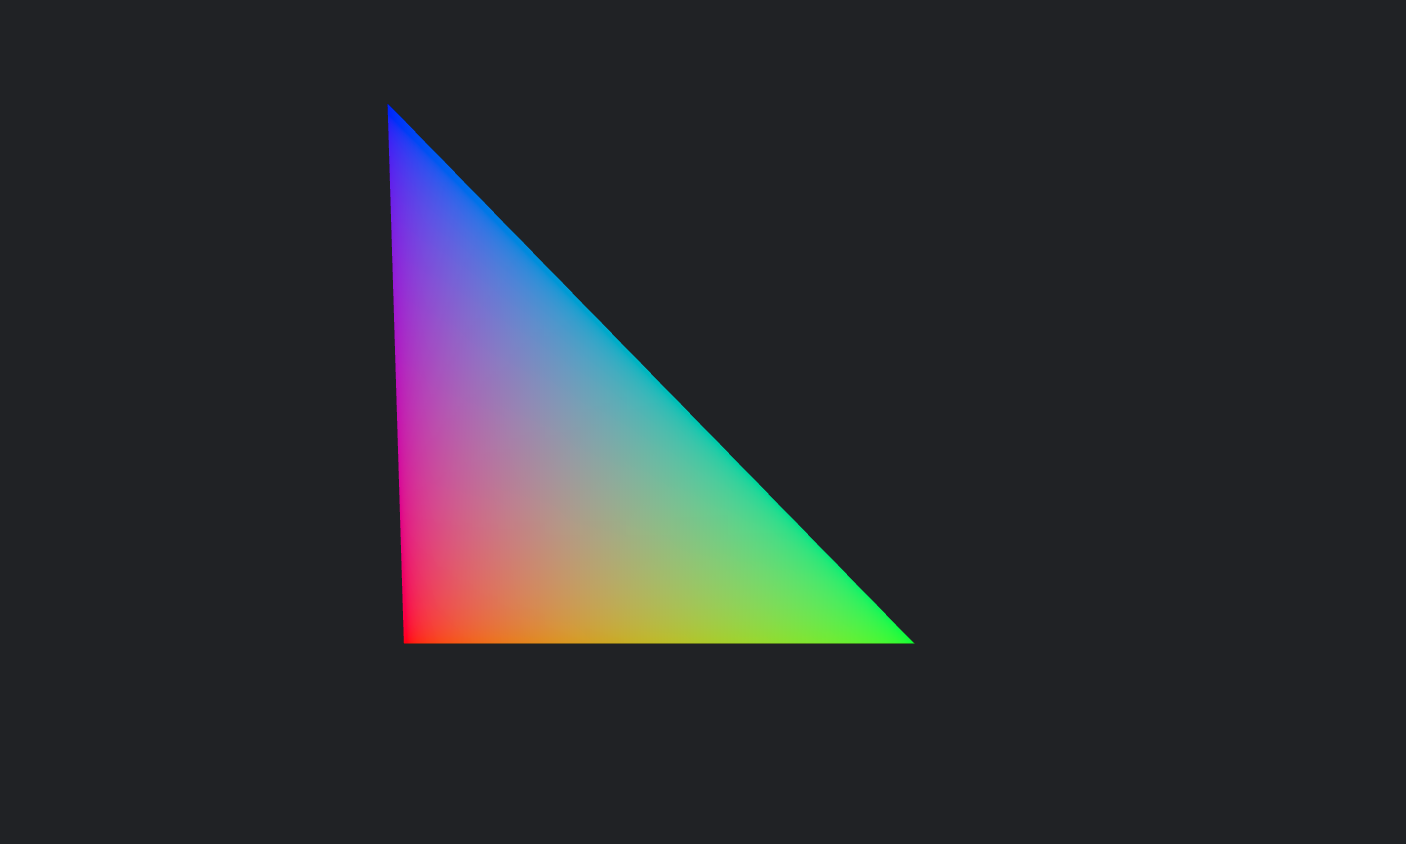
创建一个五彩斑斓的三角形
const positions = new Float32Array([
  0, 0, 0,
  1, 0, 0,
  0, 1, 0,
]);
const positionAttribute = new THREE.BufferAttribute(positions, 3);

const colors = new Float32Array([
  1, 0, 0,
  0, 1, 0,
  0, 0, 1,
]);
const colorAttribute = new THREE.BufferAttribute(colors, 3);

const uvs = new Float32Array([
  0, 0,
  1, 0,
  0, 1,
]);
const uvAttribute = new THREE.BufferAttribute(uvs, 2);

const geometry = new THREE.BufferGeometry();
geometry.setAttribute('position', positionAttribute);
geometry.setAttribute('color', colorAttribute);
geometry.setAttribute('uv', uvAttribute);

const material = new THREE.MeshBasicMaterial({ vertexColors: true});
const mesh = new THREE.Mesh(geometry, material);
mesh.position.set(-0.3, -0.2, 0);
scene.add(mesh);
核心属性与方法
数据访问与修改
// 读取第 i 个顶点的坐标
const x = attribute.getX(i);
const y = attribute.getY(i);
const z = attribute.getZ(i);

// 修改第 i 个顶点的坐标
attribute.setXYZ(i, x + 1, y, z);
attribute.needsUpdate = true; // 修改后必须标记更新

// 批量更新顶点数据
// 用新的数组替换所有顶点
const newPositions = new Float32Array([
  -1, 0, 0,
   1, 0, 0,
   0, 2, 0
]);
attribute.set(newPositions);
attribute.needsUpdate = true;
克隆
// 克隆一个新的属性
const cloned = attribute.clone();
// 拷贝数据到另一个 BufferAttribute
const copyTarget = new THREE.BufferAttribute(new Float32Array(9), 3);
copyTarget.copy(attribute);
拷贝
// 把 otherAttribute 的第 2 个顶点数据
// 拷贝到当前 attribute 的第 0 个顶点位置
attribute.copyAt(0, otherAttribute, 1);
矩阵变换详解
applyMatrix3 - 基础 3D 变换
const angle = Math.PI / 6;
const rotationMatrix = new THREE.Matrix3().set(
  Math.cos(angle), -Math.sin(angle), 0,
  Math.sin(angle),  Math.cos(angle), 0,
  0,                0,               1
);
positionAttribute.applyMatrix3(rotationMatrix);
positionAttribute.needsUpdate = true;
缩放:
const m4 = new THREE.Matrix4().makeScale(2, 0.5, 1);
normL.applyMatrix3(new THREE.Matrix3().setFromMatrix4(m4));
positionAttribute.needsUpdate = true;
applyMatrix4 - 完整 4D 变换(含平移)
const transformMatrix = new THREE.Matrix4();
transformMatrix.makeRotationY(Math.PI / 3);
transformMatrix.setPosition(1, 2, 3);

positionAttribute.applyMatrix4(transformMatrix);
positionAttribute.needsUpdate = true;
applyNormalMatrix - 法线专用变换
在几何体发生 非均匀缩放 时,直接用位置的变换矩阵去处理法线,会让法线方向被拉伸变形,从而失去与表面垂直的关系,导致光照计算错误。
因此需要使用 法线矩阵(模型矩阵的逆转置 3×3 部分)来修正,使法线在变形后依然保持正确方向。
比如一个斜着的平面,它的法线是 (1, 1, 0)。
-
如果你只是均匀缩放(比如 x 和 y 都放大 2 倍),平面还是相似的形状,法线方向也会保持不变,不会有问题。
-
如果是非均匀缩放(比如 x 放大 2 倍,y 压缩一半): 平面的形状被拉成长方形。 对应的变换矩阵会对法线也做同样的操作:x 分量乘 2,y 分量乘 0.5。 原本的法线
(1, 1, 0)就会变成(2, 0.5, 0),方向被“挤歪”,不再垂直于新的表面。 结果是:光照计算出错,本该均匀受光的表面,可能出现奇怪的阴影或亮斑。
所以:非均匀缩放会改变方向向量的比例,导致原本正交的法线与表面不再垂直。法线矩阵的作用就是“纠正这个歪斜”,重新把法线拉回到正确的垂直方向。
只有使用法线矩阵去修正,才能让法线保持与缩放后的表面垂直,光照看起来才正常。
const transformMatrix = new THREE.Matrix4().makeScale(2, 0.5, 1);
const normalMatrix = new THREE.Matrix3().getNormalMatrix(transformMatrix);

normalAttribute.applyNormalMatrix(normalMatrix);
normalAttribute.needsUpdate = true;
实战示例
自定义几何体
// 顶点位置(每个顶点 3 个坐标:x, y, z)
const positions = new Float32Array([
  0, 0, 0,   // 顶点1
  1, 0, 0,   // 顶点2
  0, 1, 0    // 顶点3
]);
const positionAttribute = new THREE.BufferAttribute(positions, 3);

// 顶点颜色(每个顶点 3 个分量:r, g, b)
const colors = new Float32Array([
  1, 0, 0,   // 顶点1:红色
  0, 1, 0,   // 顶点2:绿色
  0, 0, 1    // 顶点3:蓝色
]);
const colorAttribute = new THREE.BufferAttribute(colors, 3);

// 顶点 UV 坐标(每个顶点 2 个分量:u, v)
const uvs = new Float32Array([
  0, 0,      // 顶点1:左下
  1, 0,      // 顶点2:右下
  0, 1       // 顶点3:左上
]);
const uvAttribute = new THREE.BufferAttribute(uvs, 2);

// 组装 BufferGeometry
const geometry = new THREE.BufferGeometry();
geometry.setAttribute('position', positionAttribute);
geometry.setAttribute('color', colorAttribute);
geometry.setAttribute('uv', uvAttribute);
这段代码定义了一个带有三组数据的几何体:位置属性决定三角形的形状,颜色属性给每个顶点赋予不同的颜色,UV 属性则提供了纹理映射的坐标。通过这种方式,我们可以自由组合和修改顶点数据,而不必依赖固定的几何体模具。
动态几何体变形
// 创建一个绕 Z 轴旋转 30° 的矩阵
const rotationMatrix = new THREE.Matrix3().makeRotationZ(Math.PI / 6);
// 将矩阵应用到 positionAttribute(顶点位置数据)
positionAttribute.applyMatrix3(rotationMatrix);
// 标记需要更新,Three.js 会在下次渲染时把数据重新上传到 GPU
positionAttribute.needsUpdate = true;
这段代码实现了批量修改顶点坐标的效果:我们先生成了一个绕 Z 轴旋转 30° 的矩阵,然后把它应用到几何体的 positionAttribute 上,相当于让三角形整体旋转。
法线修正
// 根据几何体的 4x4 变换矩阵,生成对应的法线矩阵
const normalMatrix = new THREE.Matrix3().getNormalMatrix(transformMatrix);
// 将法线矩阵应用到 normalAttribute(法线数据)
normalAttribute.applyNormalMatrix(normalMatrix);
// 标记需要更新,确保新法线会在下一帧上传到 GPU
normalAttribute.needsUpdate = true;
这段代码的作用是修正顶点法线方向。当几何体经过非均匀缩放(比如 x 方向拉伸两倍,y 方向压缩一半)时,如果直接把位置变换矩阵应用到法线上,会导致光照效果错误。
解决方法是:通过 getNormalMatrix(transformMatrix) 生成一个 法线矩阵,它实际上是变换矩阵的逆转置,用于保持法线方向的正确性。
总结
BufferAttribute 是 Three.js 中操作几何体的底层工具,它直接决定了顶点数据如何传递到 GPU。相比于固定的 BoxGeometry、SphereGeometry 等几何体,它的优势在于完全开放和灵活:你可以随时定义新的顶点、修改已有数据,甚至在运行时批量更新,从而实现自定义建模、动态效果和性能优化。
掌握 BufferAttribute 后,你能够:
-
自由定义几何体:不再受限于内置模具,顶点位置、颜色、UV 都可以自己决定。
-
动态修改数据:直接操作数组即可让模型变形或动画化,只需
needsUpdate = true即可更新到 GPU。 -
保证光照正确:通过
applyNormalMatrix修正法线,避免非均匀缩放带来的光照错误。 -
优化性能:TypedArray 批量更新能显著提高大规模顶点数据的效率。
可以说,BufferAttribute 是所有几何体的“底层基石”。理解它,不仅能帮你写出更灵活的 3D 效果,也是深入 Three.js 的必经之路。